Securely And Directly Connect Raspberry Pi IP Address: A Beginner-Friendly Guide
Ever wondered how to securely and directly connect Raspberry Pi IP address? You’re not alone. Many tech enthusiasts, hobbyists, and even professionals find themselves scratching their heads when it comes to setting up a Raspberry Pi for remote access. But don’t worry—we’ve got you covered. In this guide, we’ll break down the process step by step, so even if you’re new to the world of Raspberry Pi, you’ll feel like a pro by the end of it. Let’s dive in!
Connecting to your Raspberry Pi’s IP address might sound intimidating at first, but it’s actually simpler than you think. With the right tools and knowledge, you can establish a secure connection without breaking a sweat. Whether you’re setting up a home server, a media center, or just experimenting with IoT projects, knowing how to connect to your Raspberry Pi is essential.
This guide isn’t just about connecting your Raspberry Pi—it’s about doing it securely and efficiently. Security is key, especially when you’re dealing with devices that could potentially be exposed to the internet. So, buckle up as we explore everything you need to know about securely and directly connecting Raspberry Pi IP address.
- The Tragic Story Of Richard Thomas Accident Devastating Details And Lasting Impact
- The Ultimate Guide To Prmovies 2024 Unlocking The Future Of Public Relations
Why Securely Connecting Raspberry Pi IP Address Matters
Before we jump into the nitty-gritty, let’s talk about why securing your Raspberry Pi’s IP address is crucial. Imagine leaving your front door wide open while you’re away on vacation. Sounds risky, right? The same principle applies here. If your Raspberry Pi isn’t properly secured, you’re essentially inviting hackers to mess with your system.
Here are a few reasons why securely connecting your Raspberry Pi’s IP address is important:
- Protects Your Data: A secured connection ensures that your sensitive information stays safe from prying eyes.
- Prevents Unauthorized Access: By implementing proper security measures, you reduce the risk of someone gaining unauthorized access to your device.
- Enhances Performance: A secure setup minimizes the chances of malware or unwanted programs slowing down your Raspberry Pi.
Now that you understand the importance of security, let’s move on to the fun part—actually setting things up!
- Uncovering The Personal Life Of Tom Burke Who Is His Wife
- Unveiling The Best Gogoanime Alternatives Explore Top Sites Like Gogoanime
What You Need to Securely Connect Raspberry Pi IP Address
Before we begin, make sure you have the following essentials:
- A Raspberry Pi (any model will do).
- A microSD card preloaded with Raspberry Pi OS (or any other operating system you prefer).
- An Ethernet cable or Wi-Fi dongle, depending on your setup.
- A computer or laptop to access the Raspberry Pi remotely.
- A basic understanding of networking concepts (don’t worry, we’ll explain everything).
Once you’ve gathered all the necessary tools, you’re ready to proceed. But first, let’s take a quick detour to understand what an IP address actually is.
Understanding IP Addresses: The Basics
An IP address is like your Raspberry Pi’s digital home address. It allows devices to communicate with each other over a network. There are two types of IP addresses:
Static vs Dynamic IP Addresses
Static IP Address: This is a fixed IP address that doesn’t change. It’s great for devices that need consistent access, like servers or printers.
Dynamic IP Address: This type of IP address is assigned automatically by your router and can change over time. Most home networks use dynamic IP addresses.
For our purposes, you’ll want to assign a static IP address to your Raspberry Pi to ensure it remains consistent. Don’t worry—we’ll show you how to do that later.
Step-by-Step Guide to Securely Connect Raspberry Pi IP Address
Now that you have a basic understanding of IP addresses, let’s walk through the steps to securely connect your Raspberry Pi:
Step 1: Boot Up Your Raspberry Pi
Insert your microSD card into the Raspberry Pi and power it on. Once the operating system loads, log in using the default credentials (username: pi, password: raspberry). If you’ve already changed the default password, use your updated credentials.
Step 2: Find Your Raspberry Pi’s IP Address
There are several ways to find your Raspberry Pi’s IP address:
- Using the Command Line: Open the terminal and type `ifconfig`. Look for the `inet` address under the `wlan0` or `eth0` section.
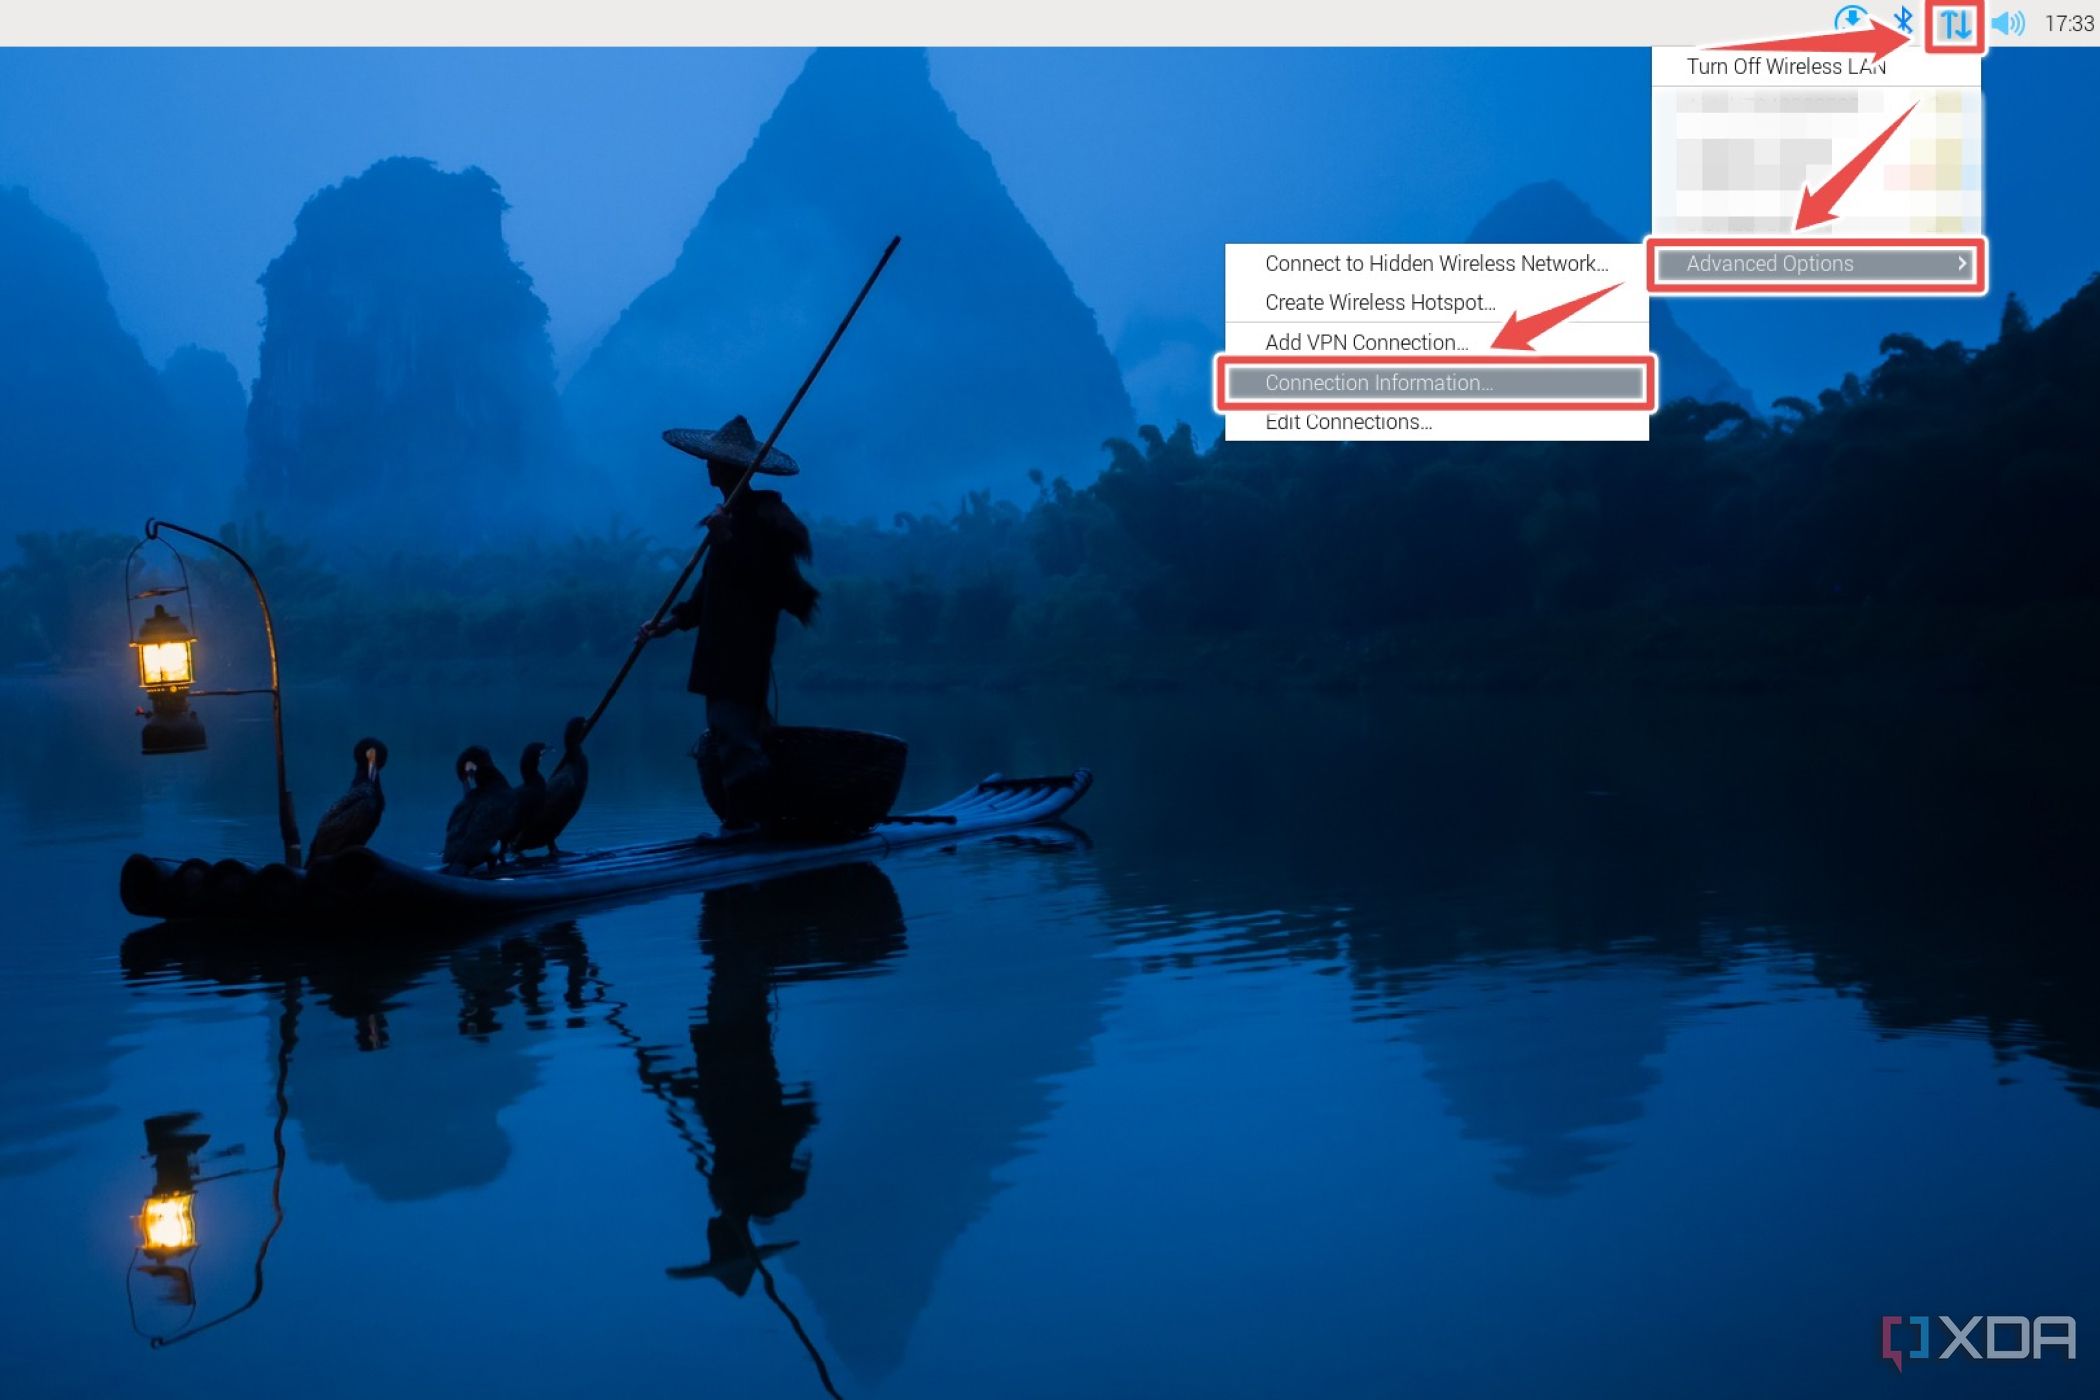
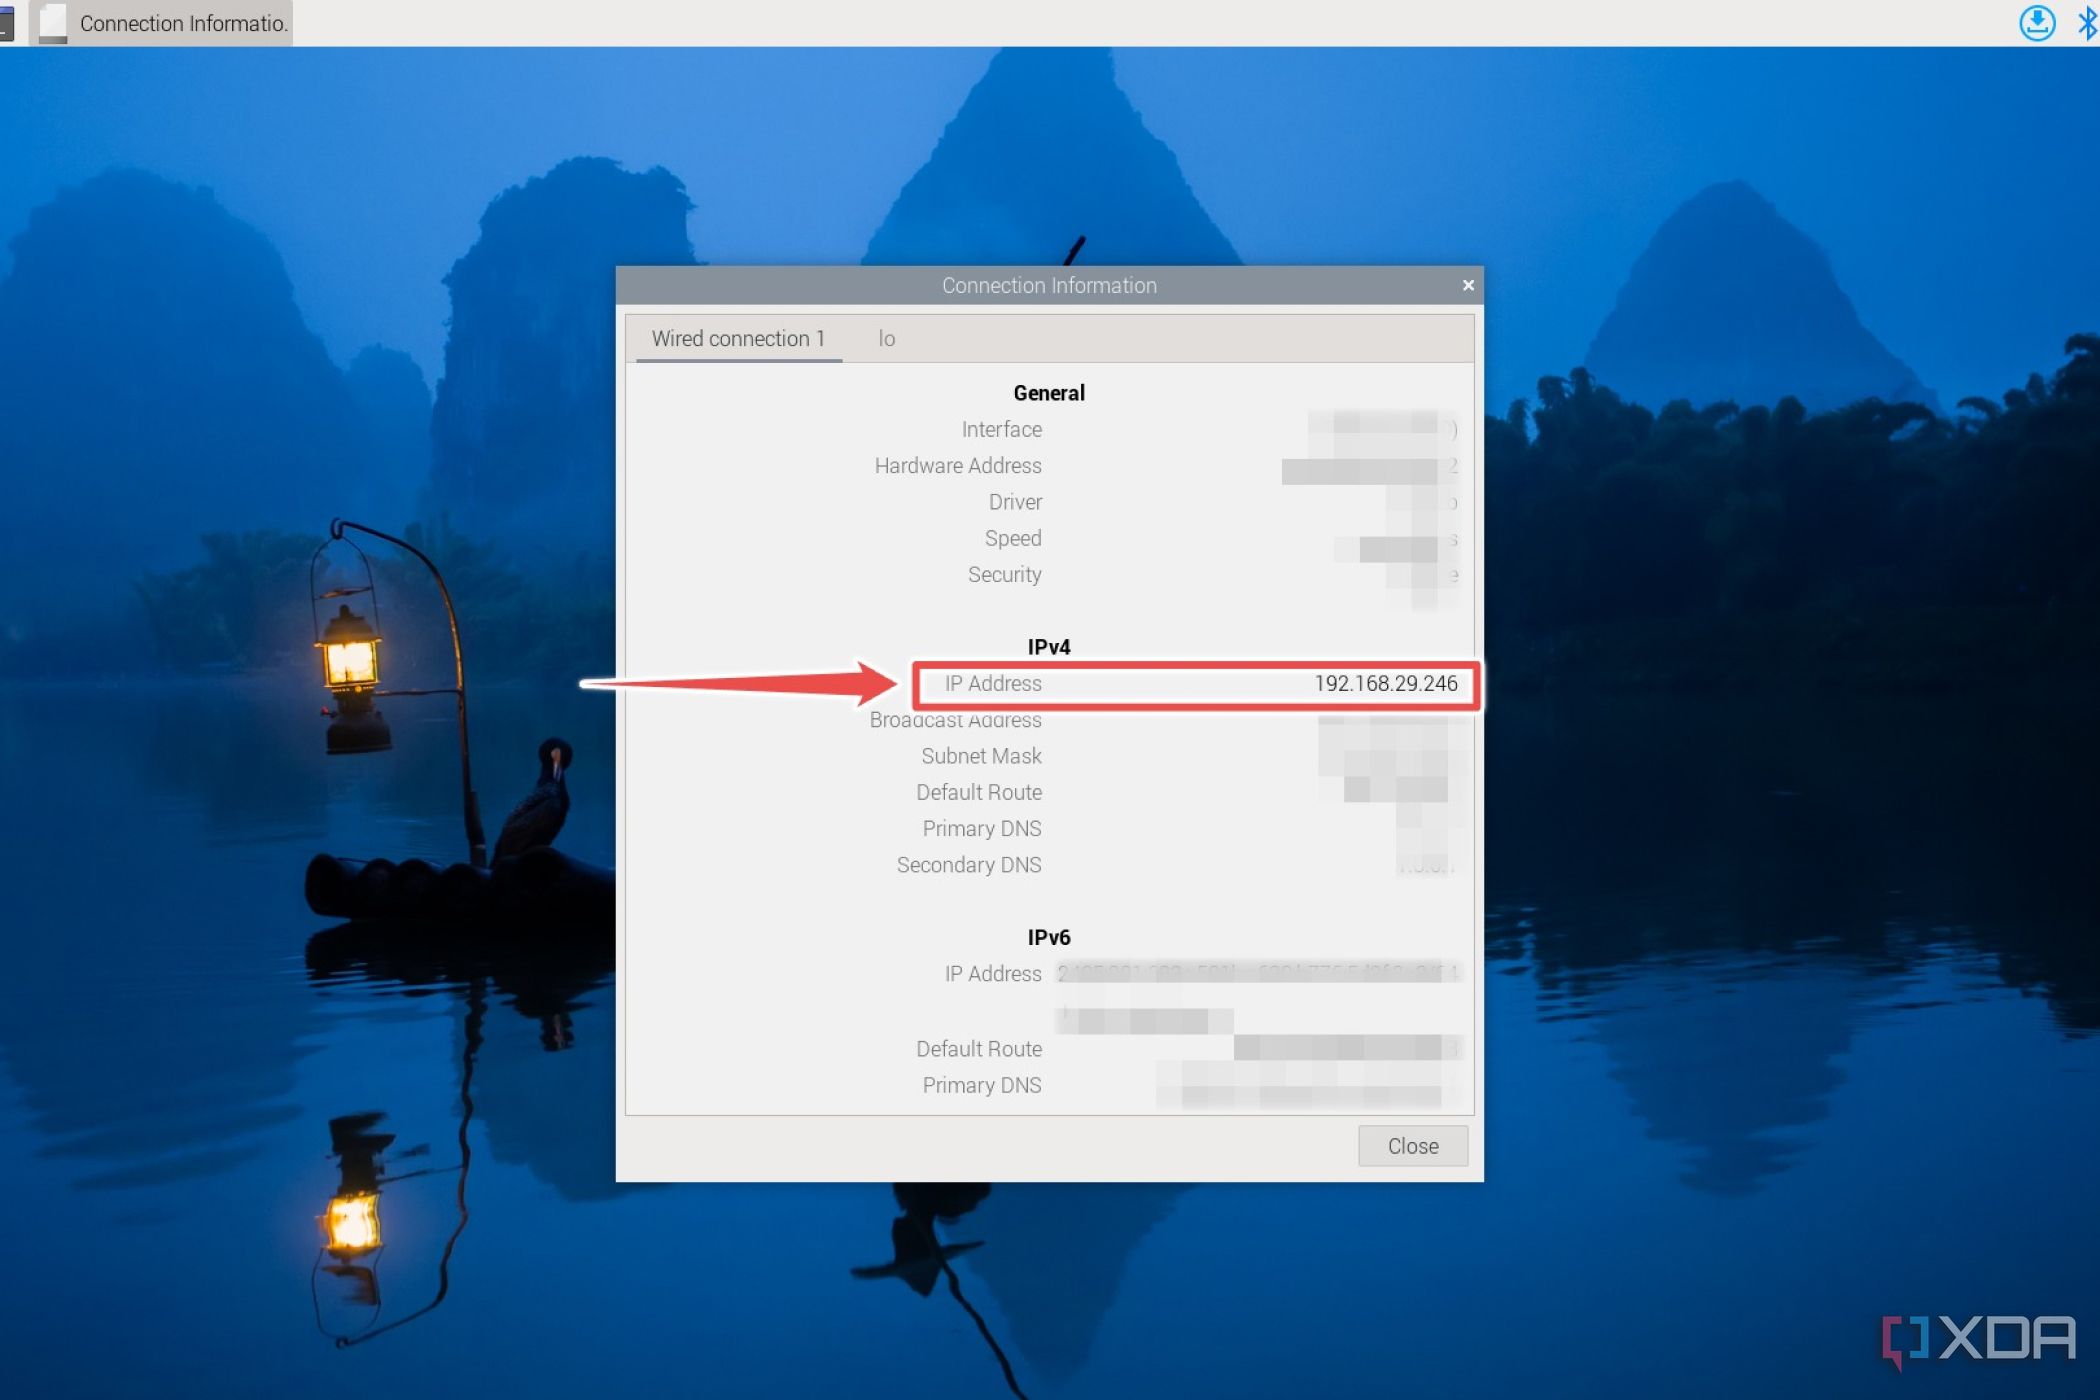
- Using the GUI: Click on the network icon in the top-right corner of the desktop and select “Connections.” Your IP address will be listed there.
- Using Your Router: Log in to your router’s admin page and check the list of connected devices. Your Raspberry Pi should be listed along with its IP address.
Once you’ve found your IP address, jot it down. You’ll need it for the next steps.
Step 3: Assign a Static IP Address
To ensure your Raspberry Pi always has the same IP address, you’ll need to assign a static IP. Here’s how:
- Open the terminal and type `sudo nano /etc/dhcpcd.conf`.
- Add the following lines at the bottom of the file:
interface eth0
static ip_address=192.168.1.100/24
static routers=192.168.1.1
static domain_name_servers=192.168.1.1
Replace `192.168.1.100` with your desired IP address and `192.168.1.1` with your router’s IP address. Save the file and reboot your Raspberry Pi.
Step 4: Enable SSH
SSH (Secure Shell) allows you to connect to your Raspberry Pi remotely. To enable SSH:
- Open the terminal and type `sudo raspi-config`.
- Navigate to “Interfacing Options” and select “SSH.”
- Choose “Yes” to enable SSH and then exit the configuration menu.
That’s it! SSH is now enabled on your Raspberry Pi.
Securing Your Raspberry Pi Connection
Now that you’ve set up SSH, it’s time to secure your connection. Here are a few tips:
Change the Default Password
The default password for Raspberry Pi is “raspberry.” Change it immediately to something stronger. Use a mix of uppercase and lowercase letters, numbers, and symbols for maximum security.
Disable Root Login
Root login allows anyone with the root password to gain full access to your system. To disable it:
- Open the terminal and type `sudo nano /etc/ssh/sshd_config`.
- Find the line `#PermitRootLogin prohibit-password` and change it to `PermitRootLogin no`.
- Save the file and restart the SSH service using `sudo service ssh restart`.
Use Key-Based Authentication
Instead of relying on passwords, you can use key-based authentication for added security. Here’s how:
- Generate a key pair on your computer using `ssh-keygen`.
- Copy the public key to your Raspberry Pi using `ssh-copy-id pi@192.168.1.100` (replace the IP address with your Raspberry Pi’s IP).
- Test the connection by typing `ssh pi@192.168.1.100`. You should be able to log in without entering a password.
Connecting to Your Raspberry Pi Remotely
With everything set up, you’re ready to connect to your Raspberry Pi remotely. Here’s how:
Using PuTTY on Windows
PuTTY is a popular SSH client for Windows. Download and install it, then:
- Open PuTTY and enter your Raspberry Pi’s IP address in the “Host Name” field.
- Select “SSH” as the connection type and click “Open.”
- Log in using your Raspberry Pi’s credentials.
Using Terminal on macOS/Linux
On macOS or Linux, you can connect directly from the terminal:
- Open the terminal and type `ssh pi@192.168.1.100` (replace the IP address with your Raspberry Pi’s IP).
- Enter your password when prompted.
Troubleshooting Common Issues
Even the best-laid plans can go awry. Here are some common issues you might encounter and how to fix them:
- Can’t Find Raspberry Pi’s IP Address: Double-check your router’s admin page or use a network scanning tool like Angry IP Scanner.
- SSH Connection Refused: Make sure SSH is enabled and your firewall isn’t blocking the connection.
- Authentication Failed: Verify that your username and password are correct. If you’re using key-based authentication, ensure the key is properly copied.
Advanced Tips for Power Users
If you’re feeling adventurous, here are a few advanced tips to take your Raspberry Pi setup to the next level:
Set Up a Dynamic DNS
If you have a dynamic IP address, consider setting up a Dynamic DNS service. This allows you to access your Raspberry Pi using a consistent domain name, even if your IP address changes.
Use a Firewall
A firewall adds an extra layer of security to your Raspberry Pi. You can use tools like `ufw` (Uncomplicated Firewall) to configure your firewall settings easily.
Enable Two-Factor Authentication
For maximum security, consider enabling two-factor authentication (2FA) for SSH. This requires users to provide a second form of verification before accessing your Raspberry Pi.
Conclusion
And there you have it—a comprehensive guide to securely and directly connect Raspberry Pi IP address. By following the steps outlined above, you can set up a secure and reliable connection to your Raspberry Pi in no time. Remember, security is key, so always take the necessary precautions to protect your device.
Now that you’ve learned how to securely connect your Raspberry Pi, why not try it out for yourself? Share your experiences in the comments below, and don’t forget to check out our other guides for more Raspberry Pi tips and tricks. Happy tinkering!
Table of Contents
- Why Securely Connecting Raspberry Pi IP Address Matters
- What You Need to Securely Connect Raspberry Pi IP Address
- Understanding IP Addresses: The Basics
- Step-by-Step Guide to Securely Connect Raspberry Pi IP Address
- Securing Your Raspberry Pi Connection
- Connecting to Your Raspberry Pi Remotely
- Troubleshooting Common Issues
- Advanced Tips for Power Users
- Conclusion

Detail Author:
- Name : Heaven Jast
- Username : runolfsson.alfreda
- Email : aidan47@yahoo.com
- Birthdate : 1972-07-01
- Address : 288 Maryse Circle Wolffview, KS 49197
- Phone : +1-351-862-3713
- Company : O'Conner, Wyman and Schinner
- Job : Potter
- Bio : Omnis ut qui asperiores ad velit. Et doloribus accusamus et. Nulla inventore laborum rerum nihil earum excepturi. Voluptates corrupti quod et eveniet.
Socials
twitter:
- url : https://twitter.com/erdman1990
- username : erdman1990
- bio : Et consequuntur fugiat doloribus et. Odit voluptas in ea maiores quia earum. Recusandae soluta expedita atque non et dolor.
- followers : 6383
- following : 1603
instagram:
- url : https://instagram.com/evans_xx
- username : evans_xx
- bio : Illo accusantium dolore minima. Qui distinctio exercitationem id autem perspiciatis iure.
- followers : 6845
- following : 1273
